

前言
本文对开源yolov5s模型进行寒武纪平台的移植
参考实现:https://github.com/ultralytics/yolov5
本文对开源yolov5s模型进行寒武纪平台的移植
整个移植过程分为模型结构转换、添加后处理算子框架代码、模型量化、在线推理和离线推理共五个步骤。
1. 模型结构转换
对于原始Yolov5网络的后处理部分的逻辑,Cambricon-PyTorch直接使用一个大的BANGC算子完成后处理的计算,需要对原生的pytorch网络进行修改,将后处理部分的整体计算换成BANGC算子。
具体做法为是将yololayer层替换成了yolov5_detection_output,把三个yololayer的输入传给了yolov5_detection_output。修改部分在yolo.py中,如下:
if x[0].device.type == 'mlu':
for i in range(self.nl):
x[i] = self.m[i](x[i]) # conv
y = x[i].sigmoid()
output.append(y)
detect_out = torch.ops.torch_mlu.yolov5_detection_output(output[0], output[1], output[2],
self.anchors_list,self.nc, self.num_anchors,
self.img_h, self.img_w, self.conf_thres, self.iou_thres, self.maxBoxNum)
return detect_out
if x[0].device.type == 'cpu':
z = []
for i in range(self.nl):
x[i] = self.m[i](x[i]) # conv
bs, _, ny, nx = x[i].shape # x(bs,255,20,20) to x(bs,3,20,20,85)
x[i] = x[i].view(bs, self.na, self.no, ny, nx).permute(0, 1, 3, 4, 2).contiguous()
if not self.training: # inference
if self.grid[i].shape[2:4] != x[i].shape[2:4]:
self.grid[i] = self._make_grid(nx, ny).to(x[i].device)
y = x[i].sigmoid()
y[..., 0:2] = (y[..., 0:2] * 2. - 0.5 + self.grid[i].to(x[i].device)) * self.stride[i] # xy
y[..., 2:4] = (y[..., 2:4] * 2) ** 2 * self.anchor_grid[i] # wh
z.append(y.view(bs, -1, self.no))
return x if self.training else torch.cat(z, 1)
2. 添加后处理算子框架代码
在第一步中我们使用了BANGC编写的Yolov5Detection算子替换掉了原始的后处理逻辑。为了保证能够正确调用到这个算子,需要将该Yolov5Detection算子集成到框架中。
共分成两步:先将算子集成到CNPlugin中,然后将CNPlugin算子集成到Cambricon-Pytorch。该算子的实现与集成到CNPlugin会在另一个教程中详细介绍,在这里只介绍将该算子集成到Cambricon Pytorch这一步骤。
1)声明算子。在catch/torch_mlu/tools/mlu_functions.yaml中声明算子
- name: yolov5_detection_output // 算子名称
use_mlu_dispatcher: custom // 分发类型,unboxed_only为标准化算子,custom为客制化算子
derived_type: cnml // 派生类型
schema_string: torch_mlu::yolov5_detection_output // 用于算子注册
arguments: // 参数
- name: alpha_data // 参数名称
type: const at::Tensor & // 参数类型
- name: beta_data
type: const at::Tensor &
- name: gamma_data
type: const at::Tensor &
- name: anchor_data
type: torch::List<int64_t>
- name: num_classes
type: int64_t
- name: num_anchors
type: int64_t
- name: img_height
type: int64_t
- name: img_width
type: int64_t
- name: conf_thres
type: double
- name: nms_thres
type: double
- name: maxBoxNum
type: int64_t return_type: at::Tensor // 函数返回类型
2)添加OpMethods基类中的CPU实现。
Catch模块中包含AtenMluType标准算子类型和AtenMluCustomType定制化算子类型,AtenMluType和AtenMluCustomType会通过OpMethods下发到推理算子或训练算子。根据模板生成的 op_methods.h算子声明,在catch/torch_mlu/csrc/aten/operators/op_methods.cpp中添加算子的CPU实现。
// op_methods.h
virtual at::Tensor yolov5_detection_output(const at::Tensor & alpha_data, const at::Tensor & beta_data, const at::Tensor & gamma_data, torch::List<int64_t> anchor_data, int64_t num_classes, int64_t num_anchors, int64_t img_height, int64_t img_width, double conf_thres, double nms_thres, int64_t maxBoxNum);
// op_methods.cpp 因为在这里并没有添加CPU实现,直接抛出异常
at::Tensor OpMethods::yolov5_detection_output(
const at::Tensor& alpha_data, const at::Tensor& beta_data,
const at::Tensor& gamma_data, torch::List<int64_t> anchor_data,
int64_t num_classes, int64_t num_anchors, int64_t img_height, int64_t img_width,
double conf_thres, double nms_thres, int64_t maxBoxNum) {
// To do: cpu kernel
throw std::invalid_argument("To do for CPU");
3)添加wrapper
推理算子或训练算子会优先分发到wrapper中。wrapper是对算子kernel的封装,每个算子对应一个wrapper。根据模板生成的wrapper头文件cnml_kernel.h,添加wrapper的实现。
// cnml_kernel.h
at::Tensor cnml_yolov5_detection_output(const at::Tensor & alpha_data, const at::Tensor & beta_data, const at::Tensor & gamma_data, torch::List<int64_t> anchor_data, int64_t num_classes, int64_t num_anchors, int64_t img_height, int64_t img_width, double conf_thres, double nms_thres, int64_t maxBoxNum);
// yolov5_detection_output.cpp
at::Tensor cnml_yolov5_detection_output(const at::Tensor& alpha_data,
const at::Tensor& beta_data,
const at::Tensor& gamma_data,
torch::List<int64_t> anchor_data,
int64_t num_classes,
int64_t num_anchors,
int64_t img_height,
int64_t img_width,
double conf_thres,
double nms_thres,
int64_t maxBoxNum) {
auto alpha_new = alpha_data;
auto beta_new = beta_data;
auto gamma_new = gamma_data;
bool cast_fp32_fp16 = (toCnmlDataType(alpha_data.dtype()) == CNML_DATA_FLOAT32);
if (cast_fp32_fp16) {
alpha_new = cnml_cast_internal(alpha_new, CNML_CAST_FLOAT32_TO_FLOAT16);
beta_new = cnml_cast_internal(beta_new, CNML_CAST_FLOAT32_TO_FLOAT16);
gamma_new = cnml_cast_internal(gamma_new, CNML_CAST_FLOAT32_TO_FLOAT16);
}
return cnml_yolov5_detection_output_internal(alpha_new,
beta_new,
gamma_new,
anchor_data,
num_classes,
num_anchors,
img_height,
img_width,
conf_thres,
nms_thres,
maxBoxNum);
}
4)添加kernel
Wrapper中通过调用kernel实现算子功能。算子的具体实现主要通过调用CNML库来完成。以下是CNML库的简要逻辑。

kernel 实 现 就 是 按 照 上 述 编 程 逻 辑 调 用 CNML 库接 口 完 成 的,在 catch/torch_mlu/csrc/aten/operators/cnml/internal/cnml_internal.h 和 catch/torch_mlu/csrc/aten/operators/cnml/internal/yolov5_detection_output_internal.cpp 中添加 kernel 函数的声明和实现。
// cnml_internal.h
at::Tensor cnml_yolov5_detection_output_internal(const at::Tensor& alpha_data,
const at::Tensor& beta_data,
const at::Tensor& gamma_data,
torch::List<int64_t> anchor_data,
int64_t num_classes,
int64_t num_anchors,
int64_t img_height,
int64_t img_width,
double conf_thres,
double nms_thres,
int64_t maxBoxNum);
// yolov5_detection_output_internal.cpp
at::Tensor cnml_yolov5_detection_output_internal(const at::Tensor& alpha_data,
const at::Tensor& beta_data,
const at::Tensor& gamma_data,
torch::List<int64_t> anchor_data,
int64_t num_classes,
int64_t num_anchors,
int64_t img_height,
int64_t img_width,
double conf_thres,
double nms_thres,
int64_t maxBoxNum) {
int batch_size = alpha_data.size(0);
int inputNum = 3;
int output_num = 2;
int maskGroupNum = 3;
int classNum = num_classes;
int maxbox_num = maxBoxNum;
int net_w = img_width;
int net_h = img_height;
float confidence_thresh = static_cast<float>(conf_thres);
float nms_thresh = static_cast<float>(nms_thres);
cnmlTensor_t cnml_input_ptr[3];
cnmlTensor_t cnml_output_ptr[2];
// prepare input cnml tensor
auto* alpha_impl = getMluTensorImpl(alpha_data);
auto alpha_cnml = alpha_impl->CreateCnmlTensor(CNML_TENSOR,
toCnmlDataType(alpha_data.dtype()));
auto* beta_impl = getMluTensorImpl(beta_data);
auto beta_cnml = beta_impl->CreateCnmlTensor(CNML_TENSOR,
toCnmlDataType(beta_data.dtype()));
auto* gamma_impl = getMluTensorImpl(gamma_data);
auto gamma_cnml = gamma_impl->CreateCnmlTensor(CNML_TENSOR,
toCnmlDataType(gamma_data.dtype()));
// prepare input cnml tensor
auto output = at::empty({batch_size, maxbox_num * 7 + 64, 1, 1},
alpha_data.options());
auto* output_impl = getMluTensorImpl(output);
auto output_cnml = output_impl->CreateCnmlTensor(CNML_TENSOR,
toCnmlDataType(output.dtype()));
// prepare input cnml tensor for multicore
int buf_size = 1024 * (alpha_data.size(2) * alpha_data.size(3) +
beta_data.size(2) * beta_data.size(3) +
gamma_data.size(2) * gamma_data.size(3));
auto temp_buf = at::empty({batch_size, buf_size, 1, 1}, alpha_data.options());
auto* temp_buf_impl = getMluTensorImpl(temp_buf);
auto temp_buf_cnml = temp_buf_impl->CreateCnmlTensor(CNML_TENSOR,
toCnmlDataType(temp_buf.dtype()));
// End the execution flow if not MLU device
CHECK_MLU_DEVICE(output);
cnml_input_ptr[0] = alpha_cnml;
cnml_input_ptr[1] = beta_cnml;
cnml_input_ptr[2] = gamma_cnml;
cnml_output_ptr[0] = output_cnml;
cnml_output_ptr[1] = temp_buf_cnml;
// prepare h_arr
std::vector<int> h_arr_data(64, 1);
h_arr_data[0] = alpha_data.size(2);
h_arr_data[1] = beta_data.size(2);
h_arr_data[2] = gamma_data.size(2);
int h_data[] = {h_arr_data[0], h_arr_data[1], h_arr_data[2]};
// prepare w_arr
std::vector<int> w_arr_data(64, 1);
w_arr_data[0] = alpha_data.size(3);
w_arr_data[1] = beta_data.size(3);
w_arr_data[2] = gamma_data.size(3);
int w_data[] = {w_arr_data[0], w_arr_data[1], w_arr_data[2]};
// prepare bias_arr
std::vector<float> bias_arr_data(64, 1.0);
float bias_data[64];
for (int i = 0; i < num_anchors; i++) {
bias_arr_data[i] = (float)anchor_data[i];
bias_data[i] = bias_arr_data[i];
}
cnmlPluginYolov5DetectionOutputOpParam_t Yolov5params;
TORCH_CNML_CHECK(cnmlCreatePluginYolov5DetectionOutputOpParam(&Yolov5params,
batch_size,
inputNum,
classNum,
maskGroupNum,
maxbox_num,
net_w,
net_h,
confidence_thresh,
nms_thresh,
GET_CORE_VERSION,
w_data,
h_data,
bias_data));
cnmlBaseOp_t yolov5_op;
TORCH_CNML_CHECK(cnmlCreatePluginYolov5DetectionOutputOp(&yolov5_op,
Yolov5params,
cnml_input_ptr,
cnml_output_ptr));
// return to JIT if running mode is fuse
CHECK_RETURN_TO_FUSE(yolov5_op, output);
// get queue and func_param
cnrtInvokeFuncParam_t func_param;
static u32_t affinity = 0x01;
int data_parallelism = 1;
func_param.affinity = &affinity;
func_param.data_parallelism = &data_parallelism;
func_param.end = CNRT_PARAM_END;
auto queue = getCurQueue();
// compile all ops
TORCH_CNML_CHECK(cnmlCompileBaseOp(yolov5_op,
GET_CORE_VERSION,
GET_CORE_NUMBER));
void* input_addrs[3];
void* output_addrs[2];
input_addrs[0] = alpha_impl->raw_mutable_data();
input_addrs[1] = beta_impl->raw_mutable_data();
input_addrs[2] = gamma_impl->raw_mutable_data();
output_addrs[0] = output_impl->raw_mutable_data();
output_addrs[1] = temp_buf_impl->raw_mutable_data();
// compute operator
TORCH_CNML_CHECK(cnmlComputePluginYolov5DetectionOutputOpForward(yolov5_op,
input_addrs,
3,
output_addrs,
2,
&func_param,
queue));
syncQueue(queue);
TORCH_CNML_CHECK(cnmlDestroyPluginYolov5DetectionOutputOpParam(&Yolov5params));
TORCH_CNML_CHECK(cnmlDestroyBaseOp(&yolov5_op));
return output;
}
5)重新编译Cambricon-Pytorch
上述步骤操作完,重新编译Cambricon Pytorch, 进入python环境确认是否集成成功,如下:
Python 3.5.2 (default, Nov 12 2018, 13:43:14)
[GCC 5.4.0 20160609] on linux
Type "help", "copyright", "credits" or "license" for more information.
>>> import torch
>>> import torch_mlu
CNML: 7.7.0 a414883
CNRT: 4.6.0 e158c88
>>> torch.ops.torch_mlu.yolov5_detection_output
<built-in method yolov5_detection_output of PyCapsule object at 0x7f40636e7810>
3. 模型量化
为什么要量化:量化是将float32的模型转换为int8/int16的模型,可以保证计算精度在目标误差范围内的情况下,显著减少模型占用的存储空间和带宽,加速推理;比如int8模型是指将数值以有符号8位整型数据保存,并提供int8定点数的指数position和缩放因子scale,因此int8模型中每个8位整数i表示的实际值为:value=( i*2^position ) / scale。设备在进行在线推理和生成离线模型时仅支持输入量化后的模型。
操作步骤:对已有的yolov5s_1.3a.pt模型文件进行量化。示例参考yolov5_pytorch_demo/quantize_online目录中python quant.py脚本,量化后即在当前目录生成量化后的模型为yolov5s_int8.pt
参数含义:
- quantized_model = torch_mlu.core.mlu_quantize.quantize_dynamic_mlu(model, qconfig_spec=None, dtype=None, mapping=None, inplace=False, gen_quant=False)
- model:待进行量化的模型。在生成量化模型时, model 必须是加载过原始的权重。在运行量化模型时, model 不必要加载权重,仅仅是原始网络定义即可
- qconfig_spec:配置量化的字典
- dtype:设置量化的模式。当前支持‘int8’和‘int16’模式,使用字符串类型传入
- mapping:设置量化的层,保持默认即可
- inplace:设置是否进行模型的深拷贝。保持默认参数即可
- gen_quant:设置是否进行量化的生成。默认为 False。在生成量化模型时,设置 gen_quant=True。在运行量化模型时,保持默认参数即可
其中qconfig_spec包括:{‘iteration’ : 1,‘use_avg’ : False,‘data_scale’ : 1.0,‘mean’ : [0,0,0],‘std’ : [1,1,1], ‘firstconv’ : True, ‘per_channel’ : False}
- iteration:设置用于量化的图片数量。默认值为 1,即使用 1 张图片进行量化。
- use_avg:设置是否使用最值的平均值用于量化。默认值为 False,即不使用。
- data_scale:设置是否对图片的最值进行缩放,默认值为 1.0,即不进行缩放。
- mean:设置数据集的均值。默认值为 [0,0,0],即减均值 0。
- std:设置数据集的方差。默认值为 [1,1,1],即除方差 1
- firstconv:设置是否使用 firstconv。默认值为 True,即使用 firstconv。如果设置为 False,则上述 mean、 std 均失效,不会执行 firstconv 的计算。
- per_channel:设置是否使用分通道量化。默认值为 False,即不使用分通道量化。
参考代码:
parser = argparse.ArgumentParser()
parser.add_argument('--cfg', type=str, default='yolov5s.yaml',help='model.yaml')
parser.add_argument('--device', default='cpu',help='cuda device, i.e. 0 or 0,1,2,3 or cpu')
opt = parser.parse_args()
# 获取yolov5网络文件
net = yolo.get_model(opt)
# 在这里设置firstconv参数为False,因为该模型首层为focus算子,非卷积,无法开启first_conv
qconfig={'iteration': 1, 'use_avg':False, 'data_scale':1.0, 'firstconv':False, 'per_channel': False}
# 调用量化接口
quantized_net = mlu_quantize.quantize_dynamic_mlu(net.float(),qconfig_spec=qconfig, dtype='int8', gen_quant=True)
# 设置为推理模式
quantized_net = quantized_net.eval().float()
# 读取图片做预处理
img_mat = Image.open("./images/image.jpg")
if img_mat.mode != 'RGB':
img_mat = img_mat.convert('RGB')
crop = 640
resize = 640
transform = transforms.Compose([
transforms.Resize(resize),
transforms.CenterCrop(crop),
transforms.ToTensor(),
])
img = transform(img_mat)
im_tensor = torch.unsqueeze(img, 0)
im_tensor = im_tensor.float()
# 推理生成量化值
quantized_net(im_tensor)
# 保存量化后的模型
torch.save(quantized_net.state_dict(), './yolov5s_int8.pt')
4. 在线推理
操作步骤:对步骤2生成的量化后的yolov5s_int8.pt进行在线推理测试。对图片进行推理,画出目标框和标注置信度。在yolov5_pytorch_demo/quantize_online目录中,示例如下:
1) 逐层模式 python detect.py
推理后的图片存储在./results目录下

推理过程:
融合模式:被融合的多个层作为单独的运算(单个 Kernel)在 MLU上运⾏。根据⽹络中的层是否可以被融合,⽹络被拆分为若⼲个⼦⽹络段。 MLU 与 CPU 间的数据拷⻉只在各个⼦⽹络之间发⽣。
逐层模式:逐层模式中,每层的操作都作为单独的运算(单个 Kernel)在 MLU 上运⾏,⽤⼾可以将每层结果导出到 CPU 上,⽅便⽤⼾进⾏调试。
一般来说,在线逐层模式更适用于调试环节,在线融合模式可以查看网络融合情况;
主要步骤:
1)设置:torch.set_grad_enabled(False) # 注意:在运行 MLU 推理融合模式时,这个条件是必须要设置的。
2)获取模型加载权重:
net = yolo.get_empty_model(opt) quantized_net = torch_mlu.core.mlu_quantize.quantize_dynamic_mlu(net) state_dict = torch.load('yolov5s_int8.pt') quantized_net.load_state_dict(state_dict, strict=False)
3)使用逐层模式进行推理: input_imgs = input_imgs.to(ct.mlu_device()) # 该命令将输入tensor转换到mlu上运行 detections = model(input_imgs) # 推理
4)如果要运行在线融合模式,需要在运行前向过程前调用jit.trace()接口生成静态图。首先会对整个网络运行一遍逐层模式,同时构建一个静态图;然后对静态图进行优化(包括去除冗余算子、小算子融、数据块复用等)得到一个优化后的静态图;之后会根据输入数据的设备类型进行基于设备的优化,生成针对当前设备的指令:
randn_input = torch.randn(batch_size, 3,img_height, img_width).float() model = torch.jit.trace(model, randn_input.to(ct.mlu_device()), check_trace = False)
5)最后根据推理结果为图片加框和标记置信度
参考代码:
parser = argparse.ArgumentParser()
parser.add_argument('--cfg', type=str, default='yolov5s.yaml',help='model.yaml')
parser.add_argument('--device', default='cpu',help='cuda device, i.e. 0 or 0,1,2,3 or cpu')
parser.add_argument('--jit',type=bool,help='fusion',default=False)
parser.add_argument('--save',type=bool,default=False,help='selection of save *.cambrcion')
opt = parser.parse_args()
# 获取yolov5网络并加载量化后的权重
net = yolo.get_empty_model(opt)
quantized_net = torch_mlu.core.mlu_quantize.quantize_dynamic_mlu(net)
state_dict = torch.load('yolov5s_int8.pt')
quantized_net.load_state_dict(state_dict, strict=False)
# 设置为推理模式
quantized_net = quantized_net.eval().float()
# 转移到MLU上进行推理
device = ct.mlu_device()
quantized_net.to(ct.mlu_device())
# 读取图片
img_mat = cv2.imread('images/image.jpg')
# 调用预处理函数做预处理
img = letter_box(img_mat)
# 设置融合模式,save选项表示是否生成离线模型,因为在进行在线融合推理时,可以生成离线模型
if opt.jit:
if opt.save:
ct.save_as_cambricon('yolov5s')
torch.set_grad_enabled(False)
ct.set_core_number(4)
trace_input = torch.randn(1, 3, 640, 640, dtype=torch.float)
trace_input=trace_input.to(ct.mlu_device())
quantized_net = torch.jit.trace(quantized_net, trace_input, check_trace = False)
# 推理
detect_out = quantized_net(img.to(ct.mlu_device()))
if opt.jit:
# 关闭生成离线模型
if opt.save:
ct.save_as_cambricon("")
detect_out=detect_out.to(torch.device('cpu'))
# 为原图添加框、检测类别和置信度
box_result = get_boxes(detect_out)
draw_boxes(box_result)
注意:原始的yolov5网络可以对输入的图片做自适应的预处理,使预处理后的图片可以有不同的大小。而在当前demo中,为了能够满足在线融合推理和离线推理必须是固定大小的要求,将预处理都改成了固定大小为640*640。
5. 离线推理
1)生成离线模型
操作步骤:
生成离线模型与在线推理代码相似,在yolov5_pytorch_demo/quantize_online目录中,示例如下:
python detect.py --jit True --save True
会在当前目录生成离线模型yolov5s.cambricon和离线模型信息文件yolov5s.cambricon_twins
2)离线推理
对一张图片进行离线推理,画出目标框和置信度。
示例图片放置在yolov5_pytorch_demo/offline/yolov5_offline_simple_demo/data目录下,离线模型放置在model目录下。执行make.sh在src目录下生成可执行文件,执行run.sh对一张图片进行推理,在result目录下生成推理后的图片。
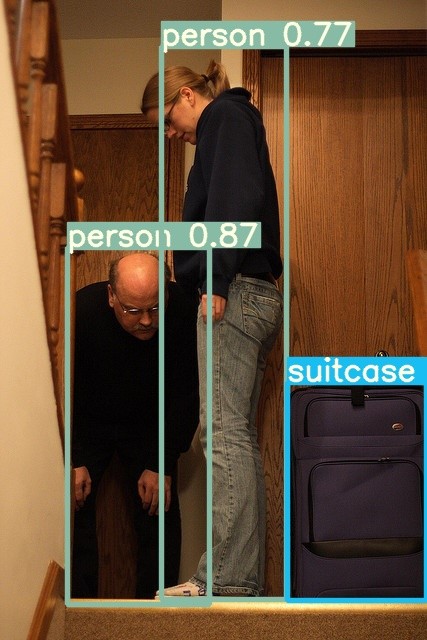
推理前后比较图如下:
